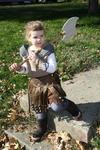
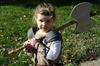
Astrid from How to Train Your Dragon
by Katie Schuh
(Springfield, IL, USA)

Astrid from How to Train Your Dragon


|
|
|
I started making the costume by making a double layered skirt. Took a panel of dark brown cotton fabric twice the length I wanted the skirt to be by 1.5 times as long as my daughters waist. (24x36 inches). I sewed the short ends together to make a tube, folded it in half and stitched around the fold about 1 inch down to make a casing for the elastic waistband. I then took the top (outer) layer of the skirt and cut and tore randomly around it then sewed up the tears and cuts back down to the bottom layer of the skirt, leaving the rough edges showing for a frayed effect.
The outer skirt was made from faux suede and cotton. The bottom pieces were made by stitching 11x1.5 inch pieces (one of each type of fabric) right sides together in a tube. A total of 12 were made. These were turned right side out and ironed. I took six of these pieces for the front panel and 6 for the back of panel of the skirt. They were pinned between layers of the suede fabric (12x6 folded in half long way, folded edge up) and sewn in place. I left the sides open and inserted loops made from bias tape so the two panels could be laced up and tied on.
The spikes on the outer layer of skirt are made from air dry craft clay. I shaped them by hand and let them dry. Then painted them with a dark brown acrylic
The shirt is made from canvas that was dyed naturally using black walnut husks. I used a shirt of my daughters that fit, folded in half and used it to trace around with a 1 inch border for seam allowance. I cut two pieces like this, one with the neck cut slightly lower than the other. Sewed the front to back at the shoulders, then zigzag stitched around the neck and around the arm holes to prevent fraying. Stitched up the sides and the shirt was done.
The shoulder armor is made from grey felt cut in 1.5 inch strips sewn down the middle of them while they were stacked slightly over lapping then stitched in place on the shirt while it was being worn to get them to lay right.
The head band was made by cutting two pieces of bias tape the circumference of my daughter's head and top stitched on top and bottom to make a tube. A short scrap of elastic was tucked in both ends of the tube and secured in place with a little glue and stitches.
The battle axe was made from thin craft foam and a stick from the yard. Stick was carved. I cut the foam into the shape I wanted and used hot glue to attach it to the stick. I then cut scrapes of foam and hot glued them on the base shape of the axe to give it depth.
Would you consider a small donation?
You will receive my craft ebook as a thank you!

Every little bit helps! If you are enjoying this site, would you consider making a small donation? I use the extra money to help with the cost of craft supplies! With any $5.00 donation or more, you will receive my 650 page ebook full of 178 craft tutorials from this site. Thank you for your consideration!
Click here to learn more about the book, and to make a donation.
Like this Site? Please share the Love!
You can follow me here:


I invite you to subscribe to
The Creative Crafter
The Creative Crafter is my quarterly newsletter that is emailed four times per year. It lets you know about any new additions to the site. As a bonus, you will get a new craft project in your email that only subscribers get to see.