Beautiful Cricut Card
Storybook Cartridge
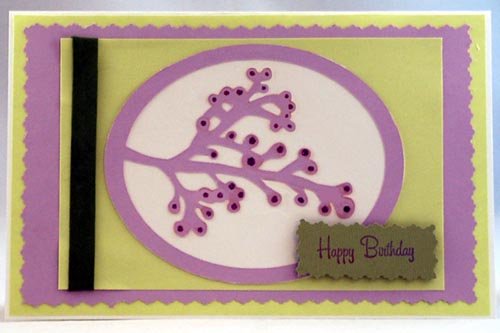
This beautiful Cricut card is made using the Storybook cartridge and can be given away for any occasion, such as a birthday, thank you, sympathy, get well, etc.
You can make several of these at one time so you always have them ready. Then, simply add a tag with the appropriate saying and you have a quick card ready at a moment's notice.
Materials Needed:
- Storybook Cartridge
- 8.5" x 11" white card stock for card base
- 8.5" x 11" Light green paper or card stock
- 8.5" x 11" Light purple paper or card stock
- Scrap of white card stock
- purple glitter glue
- Dark green or dark purple ribbon
- Small scrap of dark green or dark purple to stamp or print out the saying
- Fancy edge scissors
- Paper trimmer and or scissors
- Glue stick or pen (for intricate designs I use a fine-tipped Zig pen)
Detailed Instructions for Making this Beautiful Cricut Card:
1. Fold a
8.5" x 11" piece of white card stock
in half to create a 8.5" x 5.5" card. This will be the card
base.
2. Cut a green piece of paper or card stock to 8.25" x 5.25".
This is the first mat. Glue this mat to the
front of the card.
3.
Using fancy edge scissors, cut a purple piece of paper or
card stock to 7.5" x 4.5". Center this and glue it on to the green mat.
4.
Cut a green piece of paper or card stock to 6.75" x 3.75".
Wrap a piece of ribbon around the left edge of this paper and
tape the edges behind it. Then glue this piece of paper to
the purple mat on the front of the card.
5.
Load the white paper on to a mat.
Using the Storybook cartridge, press "shift", then the letter
"Z" (button 31). Then select the "accent blackout" special
feature button. This should select a solid oval.
Cut at size 3.5". Center this and glue it to the
front of the card.
6. Load the purple
paper on to a mat.
Using the Storybook cartridge, press "shift", then the letter
"Z"
(button 31). Then select the "accent/frame" special feature
button.
This should select the framed branch. Cut at size
3.5". Center this and
glue it on top of the white oval.
7.
Enhance the tips of the branches with a dot of purple glitter
glue and allow to dry (optional).
8.
Create a tag with a rubber stamp or a computer printer.
I added the tag with a 3D foam square to add a bit of
dimension.
Would you consider a small donation?
You will receive my craft ebook as a thank you!

Every little bit helps! If you are enjoying this site, would you consider making a small donation? I use the extra money to help with the cost of craft supplies! With any $5.00 donation or more, you will receive my 650 page ebook full of 178 craft tutorials from this site. Thank you for your consideration!
Click here to learn more about the book, and to make a donation.
Like this Site? Please share the Love!
You can follow me here:


I invite you to subscribe to
The Creative Crafter
The Creative Crafter is my quarterly newsletter that is emailed four times per year. It lets you know about any new additions to the site. As a bonus, you will get a new craft project in your email that only subscribers get to see.
Facebook Comments
Have Your Say About What You Just Read! Leave Your Comments or Questions Below.