Broom Flower Girl
This broom flower girl is a pretty door decoration for Spring. She is made from a straw broom, and her skirt is covered with ruffle lace trim.
This straw broom craft is easily decorated using silk flowers. You can find straw brooms, straw hats and flowers at your local craft store.
If you love decorating your home country-style, this broom flower girl will lend a bit of charm to your front door.
Materials Needed:
- 12 inch Straw broom
- 6 inch Straw hat
- 6 yards of ruffle lace trim
- Clothespins
- Hot Glue Gun
- Scissors
- Lightweight brown cardboard
- Some silk flowers
- Ribbon for adornments (optional)
Instructions:
1. Begin your broom flower girl by folding the straw hat in half with your hands. Make a strong crease. You might even want to put some heavy books on it, to weigh it down for awhile. Then, apply a thick amount of hot glue along the hat's inner brim, and glue the hat shut. Use clothespins to keep it clamped until it is dry.


2. Begin to apply the ruffle to the bottom of the broom (the girl's skirt). Begin at the bottom and work you way up, slightly overlapping the trim to hide the straw broom underneath. Apply a thin row of glue to the trim, then wrap around the broom. Keep working your way up until the entire broom is covered.


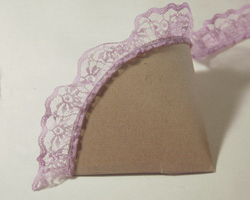
3. To make the broom flower girl's hands, measure a 8 inch diameter circle on the brown cardboard. If you would like a template, click here (Adobe Reader will open in a new window). Cut this circle in half.

4. Fold the half circle in half, but do not crease too hard. Tape the edges together to hold it. The idea is to have a quarter circle, but to have some room inside to glue some flowers.

5. Begin wrapping the ruffle lace around the hand template, just as you did for the skirt. Start at outer edge and work your way in.

6. Glue a length of ruffle along the brim of the hat. The hat can also be adorned with artificial flowers and a ribbon, if you like.


7. Glue the hands to the back of the broom skirt, right where
the skirt begins. This will take a lot of hot glue.
Or, you can use thick thread and a strong needle to attach this.

8. Put a lot of hot glue all along the broom handle, and then attach the hat.
9. Glue some artificial flowers inside her hands.
You can add a ribbon here too if you like.

10. The straw broom will probably already have a hanger on it
for hanging. Below is another example of a broom flower
girl. Have fun with your creation!

Would you consider a small donation?
You will receive my craft ebook as a thank you!

Every little bit helps! If you are enjoying this site, would you consider making a small donation? I use the extra money to help with the cost of craft supplies! With any $5.00 donation or more, you will receive my 650 page ebook full of 178 craft tutorials from this site. Thank you for your consideration!
Click here to learn more about the book, and to make a donation.
Home › Spring Crafts › Broom Flower Girl
Home › Crafts for Adults › Broom Flower Girl
Like this Site? Please share the Love!
You can follow me here:


I invite you to subscribe to
The Creative Crafter
The Creative Crafter is my quarterly newsletter that is emailed four times per year. It lets you know about any new additions to the site. As a bonus, you will get a new craft project in your email that only subscribers get to see.
Facebook Comments
Have Your Say About What You Just Read! Leave Your Comments or Questions Below.