Pumpkin Carving Tips
How to Carve a Pumpkin and Roast those Seeds!
Pumpkin carving tips can all be found here! This is a great place to learn more about pumpkin carving, and some helpful hints I've learned from years of pumpkin carving.
This pumpkin carving tips article goes into depth about doing more involved intricate carvings, but beginners will find helpful advice as well.
You'll find helpful tips on how to choose the right pumpkin, how to clean them out, transferring the pumpkin pattern, and even a recipe on how to roast the seeds. There is also advice on how to photograph the pumpkins and preserve them so they will last longer.


Click
on
any of the pumpkin carving tips below to jump around on this page, or
scroll down to read the entire article.
Tip 2: Picking out your Pumpkin
Tip 3: Cleaning out the Pumpkin
Tip 4: Preparing the Pumpkin Seeds for Eating
Tip 5: Transferring the Pattern to your Pumpkin
Tip 8: Preserving Carved Pumpkins
Tip 9: Photographing Carved Pumpkins
Click Here to See Photos of Pumpkin Carvings Others Have Shared!
Pumpkin Carving Tip 1: Choosing a Pattern
I prefer to choose my design BEFORE I pick out my pumpkin.
Or, you could get your pumpkin first and then find a face to
match the shape. But if you have some ideas in mind, it makes
it much easier later to get the correct size and shape pumpkin.
You may have a pumpkin pattern you got
free from
the Internet or from a pumpkin carving kit, or maybe you are artistic
enough to draw one freehand. Or, you could MAKE YOUR OWN pumpkin
pattern based off a photograph or clip art. Start by
searching the
Internet for pumpkin carving photos, you will find loads. Or,
you find a spooky picture of something you want to mimic, or even a
photograph of a celebrity which you can turn it into a pattern.
Once you have your pattern,
print it out at actual
size you want it to be. You may have to have it print on two
pages, and then you can tape the two pages together.
To condition the clay, break off a small piece and begin rolling it in your hands. Your hands will warm it up and it will start getting soft the more you work with it. A pasta machine can help condition the clay if you run the clay through it at the largest setting. Take the sheet and roll it in half and run it through again. Another technique is to break up the clay in a food processor. The heat of the blades help the clay to soften up. All the bits of clay can then be combined and worked with in your hands. If the clay is old, or has been exposed to UV light, it may take a very long time to condition which can be annoying and quite tiring. Store your clay in a dark, cool place to avoid this problem. Another technique is to put the clay in a ziploc baggy and let it sit in some warm water for about 20 minutes before working with it, to speed up the conditioning time. You will know the clay is conditioned properly when it doesn't crack or crumble any more.
Pumpkin Carving Tip 2: Choose the Perfect Pumpkin
First, look for the size and shape pumpkin that will match your design.
For example, if you are doing the scary villain from the
SCREAM movies, a tall pumpkin would look best. A jolly happy
pumpkin (like the one above) looks good on a nice fat pumpkin.
Next, make sure the pumpkin is a bright healthy orange and
there are no signs of mold. Also check that there are no
damage to the skin of the pumpkin, because a small nick will later
cause the pumpkin to rot. This is especially important if you pick up
your pumpkins in September or early October and expect them to last
until Halloween. A nice sturdy stem also helps and looks
good. It serves as a good handle for the top of the pumpkin.
Pumpkin Carving Tip 3: Cleaning out the Pumpkin
Spread out some newspapers on the table, and get the garbage can
nearby. Although you can cut a hole in the bottom the pumpkin, I still
prefer to cut the pumpkin in the traditional way, with the hole on the
top of the pumpkin around the stem. You will need a sharp
serrated knife for this purpose. Carefully insert the knife,
then cut a circle all around the stem.


When the circle is cut, insert a butter knife, or
another sturdy tool (I use a letter opener) into the cut, and pry open
the lid. The lid won't come off easily the first time because
of all the pumpkin strings attaching the lid to the inside. Then, take
the knife and slice off about a half inch of pumpkin skin from the lid
of pumpkin to make it nice and clean.
Next you want to clean out the inside. The first
step is to reach your hand inside and scoop out the seeds by cupping
your hand and running it along the inside of wall of the pumpkin.
Put these into a colander/strainer if you are saving them.
This is simply the fastest and easiest way to remove the
seeds and pumpkin "strings", although you do get your hands dirty!


Next, "scoop" out the rest of the insides by scraping the inside pumpkin walls with a metal spoon or ice cream scoop. Here's a good pumpkin carving tip: the very best tools to use are ones made for this purpose, try Pumpkin Masters products. They are shorter so the handle doesn't get in the way. The idea is to remove the inside pumpkin skin, actually carving it away. There are two reasons for this: carving the skin away "cleans" it by leaving a smooth surface with no gooey pumpkin strings, and "thins" out the walls of the pumpkin, which looks best when illuminated. You want to carve away at the inside skin until it is only one inch thick in the front of the pumpkin where the design will be.

Pumpkin Carving Tip 4: Preparing the Pumpkin Seeds for Eating
If you have no interest in saving the seeds to eat, feel free to skip this section. But I absolutely LOVE warm pumpkin seeds from the oven and devour them immediately. Rinse those seeds in the colander really well under running tap water. Use your hands and move the seeds around to detach any orange pumpkin guts from sticking to them. This is most easily done by running the pumpkin threads through your fingers and all the seeds will "pop" off. Pick out any orange flesh you may see in the colander.
When they look nice and clean, transfer the seeds to a shallow wide dish of warm water into which a few teaspoons of regular table salt has been added, and let them soak for about 30 minutes. Then, drain the seeds in a colander but do not rinse them. Spread them out in a single layer on an ungreased cookie sheet. Salt them well.
Bake at 250 degrees F for 30 minutes, then move them around with a spatula and try to flip them, and salt them again. Put them back in the oven for another 30 minutes or so. Keep checking, you want them to be really dry and crisp. All signs of moisture should be gone. This sometimes takes more time than 1 hour of baking, but at that low of a temperature it is hard for them to burn. Just don't forget about them! I do this step before I start my carving, so that they are baking while I am working.
When they are done, they will taste crunchy, not chewy, when you bite into them. Eat them warm, they are the best!
Roasted Pumpkin Seed Recipe:
- Clean seeds
- Soak seeds in salted water for 30 minutes
- Drain salted water (do not rinse seeds)
- Place seeds on foiled lined baking sheet
- Salt seeds well
- Bake at 250°F for one hour or until they are dry and crunchy. Toss them a few times, and be sure to salt them again when you flip them.
- Store them in an airtight container
Pumpkin Carving Tip 5: Transferring the Pumpkin Pattern to Your Pumpkin
Many pumpkin carving kits come with a small poker tool to transfer the pattern onto your pumpkin. The idea is to poke tiny holes, in the outline of the pattern, onto your pumpkin. I find this to be very time consuming. Also, it is sometimes hard to make out more intricate patterns when you remove your paper pattern, unless you poked the holes very very close together, which again, takes a ton of time!
Now here's a pumpkin carving tip I want to share: I have found it so much easier to transfer the pattern to the pumpkin using carbon paper. You can still find carbon paper in office supply stores, usually by the typewriter supplies, but just ask someone if you are having trouble finding it. Place the carbon paper under the pattern, as shown below, then cut out the pattern itself. Tape this pattern to the pumpkin. You may have to fold the paper upon itself in some areas to make it flush with the curved pumpkin surface. See the photos below:


Next, using a pointed tool, trace the pattern. Important
pumpkin carving tip: YOU NEED TO PRESS HARD! As hard as you
can. This gets tough on your hands but I personally still
find it faster and easier than poking a bunch of holes. The
carbon paper doesn't transfer as easily on pumpkin skin than it does on
regular paper. You can use a ball point pen for tracing, or
like myself, I used a stylus from my PDA which worked well.
When you are finished, remove the pattern. You will see your
pattern transferred, although it may be very light. I like to
go over it then with a washable marker or ball point pen.


Pumpkin Carving Tip 6: Carving the Pumpkin
It really, really helps to invest in some pumpkin carving
tools. You will use them year after year. They are
so easy to use, and relatively inexpensive. Even for simple carvings
they make the job much easier with nice clean cuts. I
recommend the Pumpkin Masters Carving Kit, (a link to buy this
from Amazon is above on the left side of the screen), which include
little saws for carving. The saws are easily inserted along
one of your pattern lines, and then you "saw" back and forth with the
little blade to make the cuts. If you have these little saws,
even intricate pumpkin patterns are easy to carve.
To carve little holes, which commonly occur in the
character's eyes, a drill comes in handy. Just have a paper
towel or tissue ready to soak up some of the juice that will spill out.
Another important pumpkin carving tip:
Start carving the tiny sections first. It is
important to look at the pattern and figure out what areas will not be
supported well by the surrounding pumpkin skin, because these need to
be carved out first. As a general rule, you want to carve out
the features in the middle of the pumpkin first and then work your way
out. Begin by carving out the small tiny features, and leave
the large features for last.

o remove the cut pumpkin pieces, gently push them out with your thumb so the piece falls inside the pumpkin. If the piece is too tiny for your thumb, find another tool. I find my letter opener works good as a tool in this case too, since it has a pointed, but blunt end. Q-tips, pencils, or toothpicks may also come in handy. If a piece doesn't want to give, don't "over push". Instead, take your saw and cut around the outline again, to make sure everything is a clean cut. Then gently try again. For large pieces, or pieces with a lot of angles, it is best to remove sections at a time to minimize stress on the pumpkin. See the photo below as an example. The mouth was a large piece to remove so I cut it into sections and removed each one at a time.

A technique you may see on some pumpkin patterns is carving away the orange pumpkin skin, but leaving the light orange flesh behind (not carving all the way through). This gives an amazing 3D effect when the pumpkin is illuminated. It is a technique used if you make a pumpkin pattern from a photograph, the method I mentioned earlier. To do this, I found the best tool to use is a scalpel or Exacto knife. If not, a small sharp paring knife works too. Outline the shape to be "shaved off" with the blade, digging into the pumpkin flesh about 1 mM to 2 mM. Once you cut out the outline, insert your blade parallel to the pumpkin to cut off, or "scoop out" the layer of skin. Work slowly here. The effect is beautiful.
Pumpkin Carving Tip 7: Fixing Mistakes
If you accidently saw off a tooth of the pumpkin face, or a
delicate part that didn't have much support breaks off, you can try to
re-insert the pumpkin piece using a toothpick or pin. Just
pierce the bottom of the pumpkin piece with a toothpick and pierce the
other end of the toothpick through the pumpkin where the piece goes,
letting the toothpick be the support.
Pumpkin Carving Tip 8: Preserving Carved Pumpkins
Unfortunately, your pumpkin won't last forever, unless you
bought one of those fake carvable pumpkins. But there are a
few things you can do to help them last a week or so. First,
when the pumpkin is done, rinse it out well, on the inside and the
outside. The water will clean it off and get it nice and wet.
Then blot the excess water with a paper towel. Keeping the
pumpkin moist is key, because shriveling and drying up will cause the
design to distort. A daily spritz of water from a spray
bottle will help.
Store your pumpkin in the refrigerator if you have the room,
when it is not lit. Or, store it in your garage it is cold out.
Wrapping it in plastic wrap can also help retain moisture.
I do not recommend leaving your carved pumpkins outside when
they are not in use, animals love them. I've witnessed a
squirrel eating up the cheek of one of my jack-o-lanterns!
The pumpkins may also may attract bugs, especially those
nasty cockroaches if you live down where its warmer.
Another technique is to soak the pumpkins in a
bucket of
water daily or once every two days to keep it hydrated.
Completely submerge the pumpkin if you have a vessel big
enough, and let it soak for awhile. This can also help revive
a shriveled pumpkin design, in some instances.
Coating the entire inside of the pumpkin with petroleum
jelly will also help retain moisture. Wear rubber gloves to
apply, as this stuff is extremely messy and hard to remove from your
hards. Apply this to all the cuts you made too. For the tiny
openings you can use a Q-tip to apply the jelly.
If you do want something that lasts forever, the fake carvable pumpkins
do work well. I tried one for the first time last season, and
carved my daughter's faces in it (I have a picture of the finished
product in the pumpkin photo gallery, see below if you are interested).
The material is a bit harder to carve through for intricate
designs, but this is actually better in the long run because it will
hold up well. Keep in mind you will have to also purschase a
pumpkin light to illuminate it since you cannot use a candle.
Pumpkin Carving Tip 9: Photographing Carved Pumpkins
Now that you went through all that work you will
want a good photograph of your jack-o-lantern. Try to take
your photograph right away, when it is freshly carved. This
is when they look their absolute best.
Another pumpkin carving tip is to always illuminate the
pumpkin with a white votive candle. The color white is
actually the brightest candle light for the pumpkin and will give the
best results. Place the pumpkin in a dark room. Use
a tri-pod, if you have one. If not, place your camera on a
table or another stable surface. Manually turn the flash
OFF.... you do not want to use a flash. Using a higher speed
film will also help. Take the photo. If you have to
hold the camera, remain as still as possible since the camera will be
taking a long exposure to try to take in as much light as possible.
Have fun carving! I hope you have found these
pumpkin
carving tips helpful! See below for some fun examples of what you carve
on pumpkins.
Pumpkin Carving Photos
These are photos of pumpkins I have carved. I'd love to see your pumpkin photos too!
 Freddy Kreuger - by Karen of Crafts For All Seasons
 Kiss - by Karen of Crafts For All Seasons
 by Karen of Crafts For All Seasons
 Mars Attacks - by Karen of Crafts For All Seasons
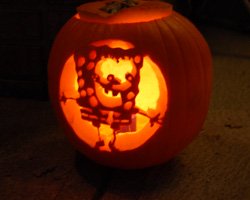 Sponge Bob - by Karen of Crafts For All Seasons
 by Karen of Crafts For All Seasons
 by Karen of Crafts For All Seasons
 by Karen of Crafts For All Seasons
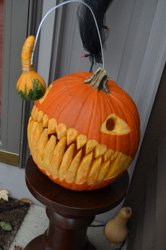 Angler Fish - by Karen of Crafts For All Seasons
Did You Carve a Pumpkin this Year? We would LOVE to see Your Photos!
Would you mind uploading your pumpkin carving photo? We would love to see the pumpkins you carved this year!
Share Your Craft - click the link to share your comments
Would you consider a small donation?
You will receive my craft ebook as a thank you!

Every little bit helps! If you are enjoying this site, would you consider making a small donation? I use the extra money to help with the cost of craft supplies! With any $5.00 donation or more, you will receive my 650 page ebook full of 178 craft tutorials from this site. Thank you for your consideration!
Click here to learn more about the book, and to make a donation.
Like this Site? Please share the Love!
You can follow me here:


I invite you to subscribe to
The Creative Crafter
The Creative Crafter is my quarterly newsletter that is emailed four times per year. It lets you know about any new additions to the site. As a bonus, you will get a new craft project in your email that only subscribers get to see.
Facebook Comments
Have Your Say About What You Just Read! Leave Your Comments or Questions Below.