Paper Cone Trees for the Holidays
Paper cone trees are truly an impressive craft, and they only cost pennies to make. Since this is a large decoration, these trees look pretty in an entryway, or nestled in a corner.
They take some time to make (allow one hour per tree) but the technique itself is very easy. You can use holiday wrapping paper (the most inexpensive option) or use patterned scrapbooking paper. Putting three together in a group, as I've done here, is a very pretty look!
I've gotten many questions about how to store these trees. I have been storing each of my trees inside a large plastic garbage bag. I then hang the bags from a nail that I have in my attic beam. This clears up room on my attic floor and has kept them intact, year after year!
Materials Needed:
- cardboard tube, from the center of a wrapping paper roll; or use a paper towel tube for a shorter tree
- wrapping paper, or scrapbook paper, in patterns/colors of your choice
- tape
- scissors
- ruler
Paper Cone Tree Instructions
1. To make the three trees as I did, I used two cardboard tubes from wrapping paper which were both 30 inches long, and one paper towel tube, which was 11 inches long. I took one of the 30 inch long tubes and cut off a 10 inch section and discarded it, leaving me with a 30 inch long tube, a 20 inch tube, and an 11 inch tube. These sizes don't matter, just cut the tubes to a size you want. The finished tree will be as tall as the tube.

2. The paper cones are made from squares of wrapping paper (or you can use scrapbook paper too). The largest cones are at the bottom, and they slowly get smaller as you work your way up. Let's begin with the 30 inch tree (the largest of the three). Begin by measuring and cutting out 8 x 8 inch squares of paper. You will need 10 to 11 squares per layer.

3. To make the cone, hold one corner down with your
non-dominant hand. Using your other hand, take another corner
and turn it to the inside to create a cone, as shown. Put a
little piece of tape on the inside to hold it.

4. Now take the other corner and wrap it around the cone to
finish it off. Secure with a piece of tape.

5. Here's what the paper cone will look like from the front and the back.


6. Attach the cone at the bottom of the paper towel tube to
create the first layer of branches. Use a piece of tape at
the tip of the cone to secure it.

7. Continue adding cones around to create the first layer. It usually takes about 10 to 11 cones to go around the cardboard tube.


8. For my two biggest trees, I did two layers each of the
same size. This means the next layer of cones should also be
made up of 8 inch squares. To attach the next layer, move up
the tube about an inch and a half to two inches above the first layer
(see the photo). Tape the cones so that they are staggered
over the layer of cones beneath it; meaning that the cone should be
positioned directly over the space in between two cones beneath it.

9. Continue adding on cones to the second layer of the paper cone tree.

10. When you get to the third and fourth layers, start working with 7 inch squares to make the cones. It gets hard to make cones any smaller than four inches. Refer to chart below on the layers and square sizes to create the three trees shown. Following this exact pattern for a paper cone tree isn't imperative; you can play around with sizes to see what works best. But these are the exact measurements I used so I wanted to include them for your reference.
11. When you get to the top, fold the tip of the cone inside the cardboard tube, and tape it to secure.


12. The top will need to be covered with some type of
decoration. Here I used bows I made from wire edged
ribbon. You could also use a star, a ball ornament, a silk
poinsettia flower, etc.

Photos From Others
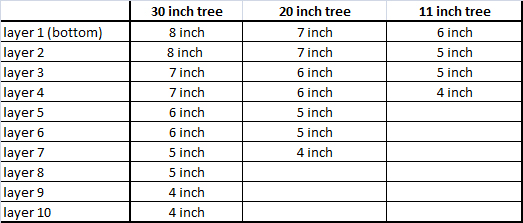
Little Paper Cone Tree
by Donna BoshW (Madisonville,
TN)
In Donna's words:
"I made this one last night. I used a paper towel roll and I really
like the turned out. Thanks for sharing this great idea with us."
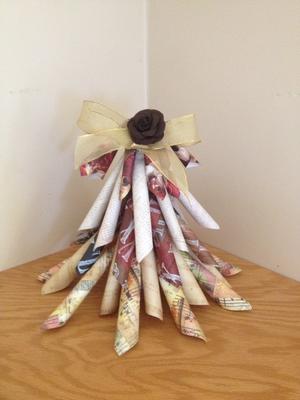
Photos of My Paper Cone
Tree
by Jeanette Pupko (Tamaqua, PA)
In Jeanette's words:
"I really enjoyed this craft. Thank you very much for the wonderful
idea, it made the perfect gift! I sent you a picture of my creations!"
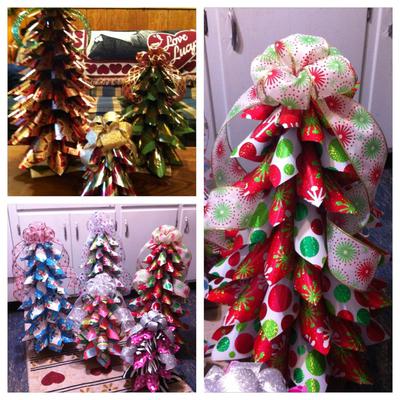
More
Beautiful Paper Christmas Trees
by Mayra Cruz (Virginia Beach, VA)
In Mayra's words:
"I was so excited to see your wrapping paper trees and I
wanted to learn how to make them. I followed your instructions and made
four trees, two for the foyer and two for my fireplace. I am sending
your some pictures of my final product. Thanks for the idea.
The trees are so beautiful and fun to make!"
Would you consider a small donation?
You will receive my craft ebook as a thank you!

Every little bit helps! If you are enjoying this site, would you consider making a small donation? I use the extra money to help with the cost of craft supplies! With any $5.00 donation or more, you will receive my 650 page ebook full of 178 craft tutorials from this site. Thank you for your consideration!
Click here to learn more about the book, and to make a donation.
Home › Christmas Crafts › Paper Cone Trees
Home › Crafts for Adults › Paper Cone Trees
Like this Site? Please share the Love!
You can follow me here:


I invite you to subscribe to
The Creative Crafter
The Creative Crafter is my quarterly newsletter that is emailed four times per year. It lets you know about any new additions to the site. As a bonus, you will get a new craft project in your email that only subscribers get to see.