Snowman Ornament

This snowman ornament is very easy to make, and they don't take long at all. These also sell very well at craft fairs.
Since it is a quick craft, it is very easy to put several of them together at once. It is easy enough for a child to make, although make sure you give them guidance. I suggest using a plastic ball ornament as opposed to glass ball ornament.. Read on to learn how to make this snowman craft!
Materials Needed:
- One frosted plastic ball ornament (usually sold in multi-packs)
- One child's sock (I always have a bunch of mis-matched socks I can pick from)
- Small length of ribbon
- Scissors
- Strong glue, such as E6000 adhesive
- Black enamel paint and a paintbrush
- Small amount of orange polymer clay (one 2 oz. pack will make several noses)
Snowman Ornament Instructions
1. Begin this craft project by gently pulling to sock over the frosted plastic ball. The sock I used was a size 2T toddler sock and it is a snug fit. Be careful as you gently push the sock on... you don't want to break the glass ball. Once it is halfway on, adjust the sock so that the top of hat is over the ornament hook, and the back of the sock comes down a bit lower than the front, to allow room for the snowman's face.

2. Next you want to tie off the top of the sock with a ribbon. Do this by tying the ribbon around the stem of the ornament where the hook comes out.t.
3. Now snip of the top of the sock, leaving a little bit of excess so you can make tassels. Then, cut some tassels in the excess sock by cutting little rows. You will now see the ornament stem inside the tassels so you can hang it up easily. See the photo for help.


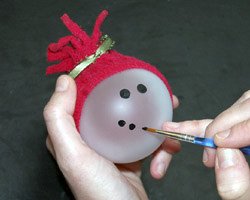
4. Paint on a face using a paintbrush and black enamel paint. This can be as simple or complicated as you choose. If you are nervous about painting, try making simple black circles like I did. You can always dip the back of a pencil eraser in paint and "stamp" on spots for perfect looking circles. Allow the paint to dry.
5. Take a small amount of orange polymer clay and shape it into a cone, to look like a carrot nose. Make sure the end of it is flush, so it can be glued well to the ornament. I make a nice clean cut with a razor blade so it is nice and flat on that side. Bake the clay piece in the oven according to the manufacturer's instructions. Allow this to cool completely.

6. Glue the nose on to the ornament using a strong glue. I used EC6000 and it worked very well.

Would you consider a small donation?
You will receive my craft ebook as a thank you!

Every little bit helps! If you are enjoying this site, would you consider making a small donation? I use the extra money to help with the cost of craft supplies! With any $5.00 donation or more, you will receive my 650 page ebook full of 178 craft tutorials from this site. Thank you for your consideration!
Click here to learn more about the book, and to make a donation.
Home › Christmas Crafts › Snowman Ornament
Home › Crafts for Adults › Snowman Ornament
Home › Crafts for Teens › Snowman Ornament
Home › Crafts for School Age Kids › Snowman Ornament
Like this Site? Please share the Love!
You can follow me here:


I invite you to subscribe to
The Creative Crafter
The Creative Crafter is my quarterly newsletter that is emailed four times per year. It lets you know about any new additions to the site. As a bonus, you will get a new craft project in your email that only subscribers get to see.