Hexagon Explosion Box
Paper Crafts


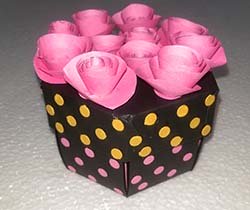
This hexagon explosion box would make a creative and unique gift for your loved one.
Explosion boxes look like a little gift, but when the lid is removed the sides fall down to reveal multiple tags where you can put photos, sayings, and other embellishments.
I've always been a fan of the
square explosion boxes,
but I wanted to try to make a hexagon version so I could have more tags
for photos. I designed the patterns, and included them for easy
printing. The best thing about this project is that it is quick and
easy to put together. The patterns fit a standard 8.5x11 inch sheet of
paper that will fit into a standard printer. In this way, you can print
right on to your patterned paper or cardstock you are using, and just
cut and fold on the lines. If you would like to make the pattern bigger
(for 12x12 paper for instance), simply print out the patterns and
enlarge them to any size you choose with a photocopier.
Making the
actual box is easy. Most of your time for this project will be spent
adding photos and decorating it. Your sweetheart is going to just love
this thoughtful and personalized gift, that you made yourself!
Materials Needed for Hexagon Explosion Box:
- Four sheets of 8.5x11" cardstock or patterned paper (in coordinating colors). Tip: The box will be more sturdy if two of the sheets (the bottom layer and the lid for the box) are made of a heavier type card stock.
- Scissors
- Glue
- 6 paper clips
- optional: scoring tool and bone folder for making straight, crisp folds
- Photos, die-cuts, stickers, embellishments, etc! Check out the scrapbooking aisle in your local craft store for tons of options!
Instructions for the Hexagon Explosion Box
1. Begin the hexagon explosion box by clicking on each of the patterns below. A PDF file will open (Adobe Reader is required) for easy printing. Put the card stock or patterned paper you are using directly in the printer to print right on to it. It works best if you use a heavy card stock for the bottom layer and for the lid. Once you print them, cut out the patterns. For the lid pattern, only cut on the bold lines. The other lines are the folding lines.
Click here to open the BOTTOM LAYER pattern
of
the hexagon box
Click here to open the MIDDLE LAYER pattern
of
the hexagon box
Click here to open the TOP LAYER pattern of
the hexagon box
Click here to open the LID pattern of the
hexagon box
2. The next step is to fold each tab on the star-like patterns you printed. It works best if you have a scoring tool and bone folder, like the attachment I have here on my paper cutter. This will ensure a nice straight fold. Once you have made a fold, fold it back and forth several times to "wear in" the fold. This is because you want the tabs to fall back easily when the lid is removed. Once you have made all the folds, you can begin to assemble the hexagon explosion box. Layer and glue the three stars on top of one another. Begin with the largest on the bottom, then the middle size, and then the smallest star on top. Only add glue to the center hexagon, allowing the tabs to move freely. This forms the bottom of the box, and it is complete except for all the decorating.


3. The next step is to prepare the lid. A heavy card stock works well,
but as you can see I chose to use a patterned paper for the lid. I
printed the pattern on heavy card stock, but then glued a thin
patterned paper to this card stock to make it more sturdy. Make the
first two folds on each tab first, as shown.

4. Next, fold the side "tabs" that are on every other side of the hexagon.

5. The side tabs will fit inside the fold of the side next to it. Apply glue to keep everything together, and then use paper clips to secure this while you allow it to dry.


7. The majority of this hexagon explosion box project will be all the decorating, and there are so many options here. I gave this explosion box to my husband. The top layer is all about our wedding. A few tabs had photos, one tab had our vows printed on it, and on one tab I glued two small wedding rings with our wedding date. The middle layer included photos from various vacations we have taken, and the bottom layer included photos of our family and children. Each layer moved chronically through our relationship, beginning wtih our wedding as the top layer and finally to the bottom layer which highlights our children. Be creative. You are only limited by your imagination. I can think of a lot of possibilities, as I'm sure you can too!
Here's a few more ideas for your hexagon explosion box:
- Make each tab have a question about the two of you, with the answer on the tab behind. For example "My favorite thing about you is...", answer "the way your smile can make my day".
- Glue a small candy to each tab.
- Write certain verses of your favorite love songs inside
- Attach ticket stubs, pressed flowers, or other special
symbols of your life together.

Photos From Others
Wedding Card Box
by Katrien van Campenhout
Belgium
"I loved this project, really a good idea! Here's a photo of one I made."

Response from Crafts For All Seasons: How beautiful!! Thank you for sharing a photo of your wedding card box - you did a great job!
Birthday Explosion Box
by Divya Alimchandani's Craft Cart
from Akola Maharashtra, India
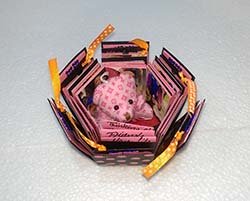
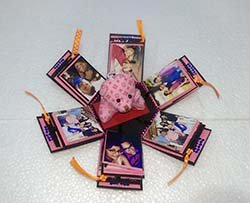
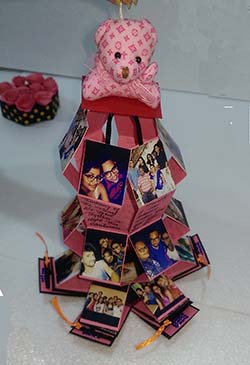


Response from Crafts For All Seasons: I love it when I post a simple example, and then I see the amazing works of art that my visitors make! Both of these explosion boxes are absolutely beautiful and so creative!! I love how Divya made this several layers tall by creating folded accordion tabs. When she pulls up on the stuffed bear, the entire project opens up and all the pictures are revealed. There are also creative touches, like the little cards that pull out of pocket folders using the ribbon tabs. This is truly a work of art, thank you Divya for sharing this project!"
Would you consider a small donation?
You will receive my craft ebook as a thank you!

Every little bit helps! If you are enjoying this site, would you consider making a small donation? I use the extra money to help with the cost of craft supplies! With any $5.00 donation or more, you will receive my 650 page ebook full of 178 craft tutorials from this site. Thank you for your consideration!
Click here to learn more about the book, and to make a donation.
Home › Valentine's Day Crafts › Hexagon Explosion Box
Home › Crafts for Teens › Hexagon Explosion Box
Home › Crafts for Adults › Hexagon Explosion Box
Home › All Occasion Crafts › Hexagon Explosion Box
Like this Site? Please share the Love!
You can follow me here:


I invite you to subscribe to
The Creative Crafter
The Creative Crafter is my quarterly newsletter that is emailed four times per year. It lets you know about any new additions to the site. As a bonus, you will get a new craft project in your email that only subscribers get to see.