Alcohol Ink Tiles

Making alcohol ink tiles was so much fun. Each tile comes out unique, which makes this project really enjoyable while you watch the creation unfold before your eyes. With the help of my talented mother-in-law, we came up with a few different techniques you can do to the art when it is almost dry, to create some really neat looks! I did these with my older daughter. The inks are toxic, and they stain everything. Be sure to wear gloves. This craft is not recommended for young children.
The ceramic tiles were purchased at Home Depot for 16 cents each... super cheap. You cannot beat the price! Plus, the tiles can be completely erased if you do not like the way it turned out, and you can start all over. All you need is regular drug store rubbing alcohol to do it. You can also find the tiles at Amazon but you will pay a bit more for them.
The alcohol inks are sold in little tiny squeeze bottles at your local craft store. At the store near me, they are near the scrapbooking aisle, near the rubber stamps. I have found that these little bottles of ink are lasting a LONG time. They average around $10 for three bottles, but you will be able to make endless tiles (and other projects too!).
A common way to use these tiles when they are complete is to turn them into coasters. You can add a square of black felt or thin cork sheeting to the back of each tile so it will not scratch your furniture. This makes a really nice gift!
I found another use though... I thought they made the prettiest little pieces of art. I was able to find 5 inch wooden frames at my local dollar store for about $3 each. I popped the glass out, and used E-6000 glue to adhere the tile right into the frame. My daughter gave these away as holiday gifts for her teachers. They loved them!
My daughter Madison has her colorful work of art displayed on her bedroom dresser on a little wooden easel, and it looks really nice. I have a set of three alcohol ink tiles hanging in a vertical row in my craft room, and I love the look.
Ready to try out these alcohol ink tiles? Read on!
Materials Needed to Make Alcohol Ink Tiles:
- ceramic tiles from any home improvement store (they should be less than 50 cents each)
- alcohol inks in at least two colors
- regular rubbing alcohol from the drug store
- paint brush
- black paint
- clear acrylic spray for sealing your art when you are done
- newspapers to cover your work area
Instructions:
1. Before beginning your alcohol ink tiles, cover your work area with newspapers, and put on old clothes. These alcohol inks WILL stain your hands and clothes. They are also toxic. I had my daughter wear disposable gloves to protect their hands.
Before I explain the next steps, I want to make it clear that there is no right or wrong way to do this! Experiment with different techniques. Here I explain exactly how I went about creating the art I made.

2. Pour some rubbing alcohol into a small jar, and use the paint brush to dab the alcohol all over the shiny surface of the ceramic tile. You want a nice, thick layer of alcohol that is just sort of "floating" on the surface of the tile. The liquid retention usually is able to the keep the alcohol on the tile edges without spilling over. Having a lot of rubbing alcohol on the surface will cause the inks to blend really well, which I think makes a nice background.

3. Next, drop some alcohol inks right on to the alcohol soaked tile... anywhere you want. Use multiple colors.
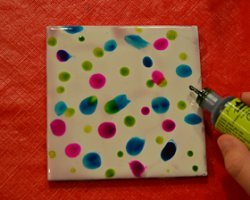
4. The next step is to WAIT! It takes patience... but just sit back and relax while you watch your tile. You will notice that the colors you dropped on will begin to move as they mix with the alcohol and blend into one another. It is fun to watch. If you notice the inks are not spreading and white parts are still showing, go ahead and add a little more ink to that area. You could also help spread the inks by blowing gently on the surface, but be careful not to mix those colors up too much! Many colors blended together will look black. Over time (about 10 minutes on average) the alcohol will begin to evaporate and the inks will start to dry. When this happens, you are ready for the next step.


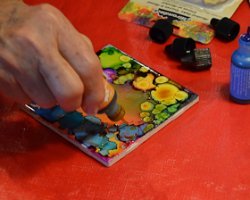
5. You should now have a nice, blended background that is almost dry. This is where it gets really fun! Follows these tips you continue creating your art.
* Spotting more alcohol inks to your piece now will create a circle of color. The size the circle spreads depends on how wet or dry your tile is (remaining alcohol causes the circle to get larger).
* Spotting on rubbing alcohol alone (try the end of your paintbrush, and just try a tiny amount) creates white spots! The colored ink will run away from the alcohol, creating amazing effects.

* When the inks are almost dry but not completely, you can try etching on curvy lines or designs using the back of your paint brush. You can also "pull" the inks from a circle you made, by running the back of your paintbrush through it.

* After the piece is completely dry, you can also use a black Sharpie marker to add in extra designs. My mother-in-law made this tile look like some fish swimming under the water.


6. Once your tiles are dry, you can protect them by giving them several light coats of clear acrylic spray. Be careful! Spray from 12 inches away and aim for several light coats. If you apply it too close and heavy it can smear or distort your art.
7. To finish off the edges of the alcohol ink tiles, paint the edges with black paint and allow to dry.

8. You can turn these into coasters by adding a square of black felt or cork sheeting to the back. Or display your alcohol ink tiles on a mini easel or glue into a wooden frame.


Would you consider a small donation?
You will receive my craft ebook as a thank you!

Every little bit helps! If you are enjoying this site, would you consider making a small donation? I use the extra money to help with the cost of craft supplies! With any $5.00 donation or more, you will receive my 650 page ebook full of 178 craft tutorials from this site. Thank you for your consideration!
Click here to learn more about the book, and to make a donation.
Home › Crafts For Adults › Alcohol Ink Tiles
Home › Crafts For Teens › Alcohol Ink Tiles
Like this Site? Please share the Love!
You can follow me here:


I invite you to subscribe to
The Creative Crafter
The Creative Crafter is my quarterly newsletter that is emailed four times per year. It lets you know about any new additions to the site. As a bonus, you will get a new craft project in your email that only subscribers get to see.