Working with Polymer Clay
Working with Polymer clay is a lot of fun! It is a versatile and creative medium to work with.
The craft possibilities are virtually endless! I have many projects on this site that uses polymer clay, because it is one of my favorite craft items to use.
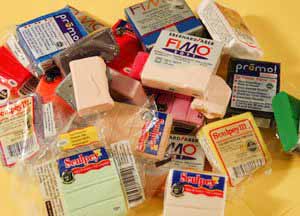
Polymer clay is sold under several brand names. Some are FIMO, SCULPEY, KATO, and PREMO!. They are sold in 2 oz. blocks for approximately $1.99 each, in craft stores. White and flesh tones can sometimes be found in your local craft store in 1 lb. bricks. Be sure to check out my E-store for great prices and selections on polymer clay as well!
Polymer clay is soft until it is cured, which is done by baking the piece in your oven for 20-30 minutes, usually at about 270 degree Fahrenheit. After the baking, the clay is cured and remains hard forever.
Before you begin, a few important notes. Working with polymer clay is very safe, but you shouldn't eat while working with the clay. Wash your hands well after using it. Some common tools that are used for polymer clay are also kitchen tools (a pasta machine, garlic press, rolling pin). Never use your tools that have touched the polymer clay for anything else in the kitchen. Once it has been used for polymer clay it is devoted to be a clay tool forever.
Conditioning Polymer Clay
Before working with polymer clay, it needs to be conditioned. Conditioning means you need to make the clay very soft, pliable, and easy to work with. A lot of clays are now being sold which are pretty soft and do not require much conditioning. My experience has shown that SCULPEY is softer than FIMO, so I prefer that brand. However, FIMO now has a brand out called FIMO SOFT, which is just as soft as SCULPEY. Even if the clay is soft right out of the package, it is still important to condition it for awhile to activate it. Unconditioned clay may break easily after being baked.
To condition the clay, break off a small piece and begin rolling it in your hands. Your hands will warm it up and it will start getting soft the more you work with it. A pasta machine can help condition the clay if you run the clay through it at the largest setting. Take the sheet and roll it in half and run it through again. Another technique is to break up the clay in a food processor. The heat of the blades help the clay to soften up. All the bits of clay can then be combined and worked with in your hands. If the clay is old, or has been exposed to UV light, it may take a very long time to condition which can be annoying and quite tiring. Store your clay in a dark, cool place to avoid this problem. Another technique is to put the clay in a ziploc baggy and let it sit in some warm water for about 20 minutes before working with it, to speed up the conditioning time. You will know the clay is conditioned properly when it doesn't crack or crumble any more.
Work Surface and Avoiding Fingerprints
When working with polymer clay, you may find it helpful to work on a smooth ceramic tile or a piece of cardstock. This serves two purposes. It is a smooth surface to roll balls, logs, and make smooth sided shapes, and avoid fingerprints being left on the clay. Secondly, the piece can be left on the tile or cardstock and placed on a cookie sheet. The paper will not burn at 270 degrees F and this is a good way to protect your cookie sheet.
You may notice it is hard to remove your fingerprints after working with polymer clay. I have heard of some people that wear tight fitting disposable latex gloves while working with the clay. Others mention brushing your piece often with a little dusting of talcum powder to help keep prints at bay. Another way is to sand your piece with a very fine grit sandpaper after the clay is cured. This allows the clay to be buffed smooth. With a little practice you will find it easier not to leave fingerprints. If you work on a piece of cardstock or a ceramic tile to help form your piece you will avoid fingerprints.
Working with Polymer Clay - Polymer Clay Tools
If you enjoy working with polymer clay, you may want to invest in a few tools. A pasta machine will help you immensely (photo below left). Pasta machines can help you to condition the clay, roll flat sheets, or combine colors. They usually retail for about $20 and can be found in most craft stores, right by the clay. Or, you can buy a pasta machine at a kitchen store. Never use the pasta machine for anything but the clay, it cannot be used for food after touching the clay.
Another invaluable tool is a slicing blade (below right). This makes nice even cuts and is great for slicing canes. A small exacto knife also comes in handy.
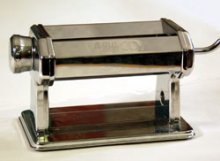 pasta machine
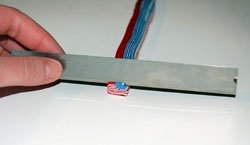 slicing blade
A brayer or rolling pin helps roll flat sheets of clay and is an invaluable tool, especially if you do not have a pasta machine.
Other tools can be found around the house, like toothpicks for poking holes, a cuticle stick for making depressions, and pencils. A food processor can be good to help condition clay and mix colors, but remember, it can only be used for clay and cannot go in the kitchen again. I also like to use a garlic press for making spaghetti like hair. They also sell clay extruder guns, with various tips to make different shapes. In my experience, I have found the clay extruder guns are difficult to work with and very hard to clean. However, others LOVE them and have good experience with them. They are great for making hair for figurines. Your clay needs to be really soft to go through an extruder.
Blending Polymer Clay Colors
If you enjoy working with polymer clay, at first you can just invest in a few blocks of clay in the primary colors. You can make more colors by blending the clays, just like paint. Combining colors is easy. Roll out two lengths of rope of the colors you want to combine, then twist them together. Roll the rope in half, and repeat the process. Repeat this over and over until all the colors are blended well. This is a good way to make a color a little lighter, instead of buying a whole new package of light blue, for instance. Just invest in buying the 1 1b. brick of white polymer clay, and you’ll have enough white to do a lot of mixing!
Sealing Coats and Glazes for Polymer Clay
After working with polymer clay, there are many different ways to protect your piece once it is cured. You can purchase polymer clay glazes, which come in gloss and matte finishes. Another quick and easy finish is to spray it with an aerosol can of acrylic sealing coat, available in craft stores.
Polymer Clay Projects - Let's Get Started!
There are several polymer clay tutorials on this site, all with step by step directions:
- Make your own Snow Globe, a fun winter project.
- Polymer clay roses adorn this Rose Wreath Pin, perfect for Valentine's Day.
- Polymer Clay Leprechaun pin for St. Patrick's Day
- Create a Polymer Clay Shamrock, so simple and easy!
- Create a unique shamrock barrette for your hair.
- These polymer clay Easter eggs is a must-see, because the tutorial explains how to make a canes.
- Create some beautiful polymer clay jewelry.
- Learn how to make an American Flag cane to create this Fourth of July bracelet.
- This polymer clay dragonfly is perfect for summer!
- Learn to make cute watermelon earrings.
- This candy corn bracelet and earrings is pretty for Halloween.
- Here's a cute polymer clay turkey for Thanksgiving.
- These Indian Corn Napkin Rings look wonderful on the Thanksgiving table.
For even more great polymer clay projects, please visit clay-it-now.com,
your clay art and craft ideas center for kids and adults with clay
model tutorials for figurines, kids crafts, personalized gift, cake
toppers, home decorations, etc.
Would you consider a small donation?
You will receive my craft ebook as a thank you!

Every little bit helps! If you are enjoying this site, would you consider making a small donation? I use the extra money to help with the cost of craft supplies! With any $5.00 donation or more, you will receive my 650 page ebook full of 178 craft tutorials from this site. Thank you for your consideration!
Click here to learn more about the book, and to make a donation.
Like this Site? Please share the Love!
You can follow me here:


I invite you to subscribe to
The Creative Crafter
The Creative Crafter is my quarterly newsletter that is emailed four times per year. It lets you know about any new additions to the site. As a bonus, you will get a new craft project in your email that only subscribers get to see.