Scrapbooking for Beginners: An Introduction
This page is about scrapbooking for beginners - after all, it doesn't have to be complicated. Do all the supplies, the variety of layouts, and terms like "cropping" intimidate you?
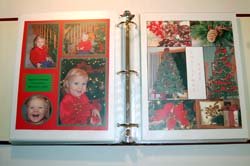
Making an album can be very simple with amazing results. Sure, if you really get into the hobby you can make your pages as intricate and artistic as you wish. But if you are just starting out, keep it simple. Remember the ultimate goal: preserving your memories and getting those photos into a book so they can be enjoyed!
This article is intended to introduce you to
making scrapbooks if you are beginner. I will explain how to organize
your photos, the basic supplies needed, types of albums, and basic
techniques to make a simple page. Use the table of contents
below to jump down the page if a category interests you, or just read
the article in its entirety. Let's get started!
Organizing
Your Photos
Types
of Albums
Scrapbook
Supplies
How
to Create Pages
Scrapbooking for Beginners: Organizing Your Photos
It is important to regularly
take the photos off your memory card of your digital camera, or the photos from your phone, and archive them on your
computer. How often you do this is up to you, but do make
this a habit. I realize this is a common problem for many
people, but think of it this way... to really get to see your
photos well you need to get them on your computer so you can view them
on your computer's photo viewer. Even though the picture
viewers on cameras are getting larger and larger these days, it is
always best to see them big to get a real sense of the photo.
Take advantage of using "cloud" services that are readily available, they will do the backups for you!
Organize your photos into a
folder into your
computer called "My Photos" or something similar. Within the
folder, make individual folders titled with the date and a description
of the event, such as "11-12-08 Keri's Birthday Party". Then
copy the photos from your memory card into this folder, and delete them
from your memory card to save space. Look at each photo after
it is copied into the folder, and delete any you do not want.
It is also a good idea to back up your photo folders twice a year (or
more often if you take a lot of photos) to an external hard
drive. In addition, many websites offer free photo sharing,
which also is a back up of all your photos.
A good way to stay organized is to print off
digital photos that you plan to scrapbook soon. I
scrapbook with my sister once per week, so I keep about a six month
supply of photos printed out to work with. When I'm through
with those photos, I print off another six month supply of
photos. Although it takes about an hour or so to look through
my photos and decide which I want to print, I only need to
devote that time a few times a year. This also allows me to
take advantage of the online photo services, such as Shutterfly, which gives you a
great savings to pre-order photos in bulk for a reduced
price. It also saves on shipping to have 200 photos shipped
to you instead of just 25 or so.
When my photos arrive in the mail, I refer back
to my computer and look up each event with the date. I place
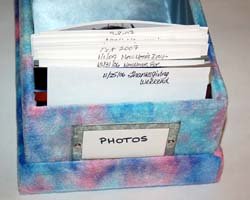
the photos in a shoe box (or a photo box that they sell for this
purpose), stacked in chronological order. I place an index
card in between the photo events, marked with the date and event
name. This way, when I go scrapbooking to my sister's house,
I grab the next event's photos and everything stays very organized.
If you own a regular camera and get your film developed, you
can stay organized the same way. Develop your film as you are
ready to archive it, or get it all developed and keep them in a photo
box. Refer back to your calendar and keep track of the dates
the photos were taken, and divide the events with an index card labeled
with the date and event name.
Continue Article on Page Two - "Types of Albums" --------------------->
Like this Site? Please share the Love!
You can follow me here:


I invite you to subscribe to
The Creative Crafter
The Creative Crafter is my quarterly newsletter that is emailed four times per year. It lets you know about any new additions to the site. As a bonus, you will get a new craft project in your email that only subscribers get to see.