Polymer Clay Easter Eggs
These polymer clay Easter eggs are a joy to make, and you will be able to enjoy them for many years.
They are very versatile Easter trimmings, because they can be placed anywhere and really look great.
They can be added to decorations, such as a wreath or a homemade basket, or have them sitting next to other decorations.
Try lining them up along the mantle or placing them in groupings on a shelf.
The polymer clay Easter eggs are very beautiful and detailed, and are not hard to make.
This project introduces polymer clay canework. Don’t worry if you have never made polymer canes before. They are easy! And I explain it all below. But, if you have NEVER worked with polymer clay before, you may want to read my Tips and Techniques page before beginning (a new window will open when you click the blue link above).
Materials Needed:
- Styrofoam egg
- Felt scrap pieces in pastel colors or light tan
- Cotton ball
- Tiny white or pink pom pom for the nose (or cut one out of felt)
- 2 color headed straight pins for the eyes (such as black, green, or blue)
- 1 small piece of ribbon for the bow
- Scissors
- Glue
Polymer Clay Easter Egg Instructions
1. Begin by the polymer clay Easter
eggs by preparing your eggs. Take a
raw egg, and push a needle through the smaller end of the egg.
Push slowly, with steady even pressure,
so you won’t crack the egg. Then
remove the needle. You should have
a tiny pin-sized hole.

2. On the other side of the egg you want to punch a hole about 5 mm wide (very small, but larger than the pin hole). To do this, prick several pin holes very close together. If you make them close enough together, they will punch out a larger hole. Make sure you push the needle in far so you are poking through the egg yolk inside, to break it.

3. Now, put your lips up to the pin-sized hole and blow gently. The inside of the egg will begin to pour out of the bigger hole you made in the bottom. Keep blowing until all the egg insides are out.
4. Rinse the egg out well with water. Do this by filling the egg with water using the larger hole. Then flip the egg over and blow out the water. Do this several times. Then, allow the eggs to dry completely, preferably overnight.
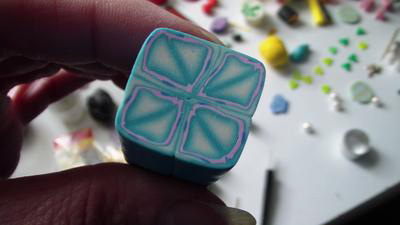
5. You are ready to start working on your polymer clay Easter eggs by making the polymer clay canes. Canes are logs of polymer clay. When segments are sliced off canes reveal a design. The little wafer slices of clay can be used to decorate things. We are going to use these cane slices to decorate your egg. Below you will find instructions on how to make three simple canes. The three cane designs were used on the eggs in the photo.
How to Make a SPIRAL Cane
This is a very impressive cane, and probably one of the most easiest to make!

A.
Begin
by flattening three different colors of polymer clay.
Using a pasta machine for flattening is
the easiest (I used the largest setting), but if you do not have a
pasta machine you can use a brayer or rolling pin to flatten.
B. Stack the three pieces of clay on top of one another, then cut them all the same size, into a rectangle shape. Push them together slightly to get rid of any air bubbles.


C. Begin to roll the rectangle up tightly, like a jelly roll.

D. The cane is almost done, but you need to compress it by rolling it. This is the trickiest part about making canes. You want to use even pressure all the way through the entire roll, making sure there isn't one area that is thicker than another. Keep rolling until it back and forth using your hand, against your work surface, until it is the diameter you want. The more you roll, the smaller the design gets, but the more slices you can cut. For this project I rolled my canes about 4 inches long.

How to Make a FLOWER cane:
This is polymer clay cane will look like a flower when it is sliced.
It begins with a spiral cane in the
middle of the flower.

A. Make a spiral cane out of yellow and white clay (see above directions for spiral cane). Condense it by rolling until it is about 0.5 cm in diameter, and about 3 inches long.

B. Make a long rope of a different color clay (I used pink). Make the rope about 0.5 cm in diameter. Cut in into six different lengths, the same length as your spiral cane (mine were about 3 inches long).

C. Place the six rope segments around the spiral cane. These are going to be the flower petals.

D. Take another contrasting color of clay now (I used a light green) and roll another long rope, about 0.5 cm in diameter. Cut this into six lengths about 3 inches long, just as you did for the flower petals. This contrasting clay should be placed in between the clay used for the petals. The clay shouldn’t be wedged way down in, and the same level as the petal clay, but instead, it should sit about halfway between each petal and a little above.


E. Roll out a flat rectangle of the contrasting clay, and roll this around the entire cane. This is the outer shell covering of the cane. Now reduce and compress your cane by carefully rolling. The photo to the bottom right shows the cane before compression.
How to Make a PANSY Cane:
This cane is so simple but when it is done it resembles a pansy design.

A. Roll a long rope of clay. Here I used purple.
B. Roll out a thin rectangle of a contrasting color, and use this rectangle to roll around the purple rope, and begin the outer shell covering. Reduce and compress the cane slightly by rolling. Now, cut this cane into three equal seqments. Mine here ended up being 0.5 cm in diameter and about 3 inches long. Place them next to each other in a set of three.


C. Use a contrasting color to roll out a flat rectangle of clay. Use this rectangle to roll around all three canes as the outer shell covering. Reduce and compress the cane.
6. Now is the fun part! Once your canes are done, let them sit for a little while to cool down. If you put it in the fridge for about 10 minutes that will help speed up the process. If you cut slices off the cane while it is still warm the slices will not be round, and they will squish down and the blade goes through.
7. Once the canes are cooled off, begin slicing! Using your blade or exacto knife, slice off thin wafers of clay (about 1 mm to 2 mm in thickness). At the end of the cane, the design may be distorted. You don’t have to use these slices if you don’t want to. You’ll find as you move in towards the center of the cane the design will look better!

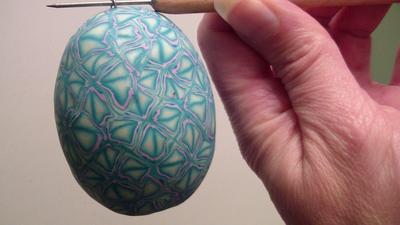
8. Push each wafer slice gently on to the surface of the egg. Push just hard enough for the clay to adhere, but be careful not to crack the delicate egg. Have each wafer touching, or you can even overlap them slightly.

9. Keep going until the entire polymer clay Easter eggs are covered. Remember to cover up the holes you made in each egg.

10. When the egg is completely covered, roll it around in your hands gently. This helps even out the clay, smooth it, and blend together the cane slices better.
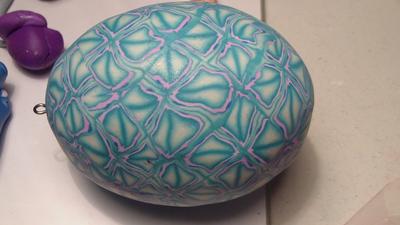
11. Bake the eggs according to the clay’s manufacturer’s instructions, and allow to cool completely. Now the egg will be very durable and hard to break.
12. The last step is to sand the polymer clay Easter eggs. You will want to experiment with different grits of sandpaper. The grit you use depends on how "bumpy" your egg is before starting. This mainly depends on the thickness of your cane slices. I like to use the sanding blocks that you can use under running water. For my polymer clay Easter eggs, I began with a medium grit paper and moved on to a very fine grit to smooth and buff. Sanding the polymer clay Easter eggs is optional, but it will make the cane wafers blend together very well and give a very smooth appearance and touch to the egg.

13. Give your polymer clay Easter eggs a coat of acrylic sealing coat or polymer clay glaze for protection (optional). When you put your Easter things away, the polymer clay Easter eggs can be stored in a regular egg carton to protect them, and they should last for many years!

Photos From Others
Easter Egg
by Leisa's Crafty Creation's
Allendale, MI
Allendale,MI "I wanted to share this example of my Easter egg I made. I created this using a polymer clay cane."
Response from Crafts For All Seasons: I LOVE how this came out! Such beautiful work! Thank you very much for sharing.
Would you consider a small donation?
You will receive my craft ebook as a thank you!

Every little bit helps! If you are enjoying this site, would you consider making a small donation? I use the extra money to help with the cost of craft supplies! With any $5.00 donation or more, you will receive my 650 page ebook full of 178 craft tutorials from this site. Thank you for your consideration!
Click here to learn more about the book, and to make a donation.
Home › Easter Crafts › Polymer Clay Easter Eggs
Home › Polymer Clay Crafts › Polymer Clay Easter Eggs
Like this Site? Please share the Love!
You can follow me here:


I invite you to subscribe to
The Creative Crafter
The Creative Crafter is my quarterly newsletter that is emailed four times per year. It lets you know about any new additions to the site. As a bonus, you will get a new craft project in your email that only subscribers get to see.