Alien Xenomorph costume
by Ian Austin
(Oneonta, NY)

Look out behind you!


|
|
|
|
Following the success of out couple's costume from last year where we went as the Maitlands from Beetlejuice with their stretched out faces, My girlfriend and I had to up the anty on our a couples costume this year.
The project we chose was to go as the icon xenomorph and Lt. Ellen Ripley from the ALIEN movie franchise.
First off, the easy one:
Ripley's costume:
Materials used:
- an actual flight suit
- Patches
- Velcro
- Wooden pieces and pin backs
- paint
- foam board
- Insulation board
- wood scraps
- elastic band
- various electrical wire
- wooden dowels
- Aluminum water bottles with screw-tops
- Battery operated flaming torch
- Wooden dowel
- screen sandpaper
- cardboard tube
How, you ask?
For the flight suit I sewed the shoulder patches on by hand. I used the black velcro strip, cut to shape and then painted to make her crew wings patch. There was also an insignia pin which I made by painting a small, round scrap of wood with the proper emblem and then glued a pin-back onto it.
For the flamethrower it was really important to me that the flam actually flickered. After scouring Halloween stores I found the battery operated torch which I used for the nozzle of the gun. The body of the gun was a block of insulation foam from Lowes which I covered with foam board to make the long, main body of the gun. The hump on top I cut out of foam board and hot-glued together.The screen on that shape is made from a piece of screen sandpaper cut to shape.
I carved the handles out of foam and drilled a hole out of the top of them and inserted the wooden dowel. I then made a hole on the bottom of the gun to insert this into and hot-glued into place.
For the fuel tanks I cut a short length of dowel to fit through the hole in the cap. I marked where each of these would go on the underside of the gun and drilled them out with a Dremel drill. The cap and dowel piece was hot glued into place on the underside of the gun and, when dried, I screwed the tanks into the caps, allowing them to hang down below the gun. The surface texture of the flamethrower was made from cast-off pieces of wood from a company that makes laser-cut doll houses. These pieces were hot-glued onto the surface. I then drilled a hole in the front of the gun and inserted the torch, then drilled a small hole in the nozzle and inserted a smaller wooden dowel to act as the port for the wire of fuel. I then cut holes in that dowel as well as the aluminum tanks and inserted lengths of wire into them and glued into place. A short length of cardboard tube that was used to roll carpet was glued to the back to make it look authentic, then the whole thing was primed and painted white.
The Not-so-easy part:
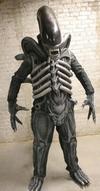
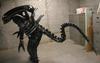
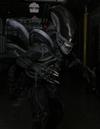
The Alien:
Materials used:
- second-hand fleece vest
- hot glue
- insulation foam
- second-hand bicycle helmet
- upholstery foam sheets (1/2")
- vacuum cleaner hoses
- foam backer rods
- insulation tubing
- plastic tubing
- PVC pipe
- epifoam sheets and blocks
- nylon straps
- felt
- black cord
- corduroy fabric
- fleece gloves
- wooden dowels
How'd I do it?
1: I took the foam insulation and glued it together into a large block using liquid nails and let dry overnight.
2: I drew the main shape of the head I wanted on the side and roughly cut out the shape using a drywall saw. I then used a razor blade to continue to cut the foam to shape.
3: I used sandpaper to sand the dome smooth. I then used a Dremel drill to carve out the mouth and other details on the head.
4: The head was painted with several layers of black enamel paint to make a crust over the foam. A slight silver finish was sprayed on the dome afterwards. Details n the mouth and sides of the head were dry-brushed on with grey paint. Teeth were painted silver.
5:I drilled out the center of the bottom of the head. I took the Bicycle helmet and cut off the sides, leaving essentially a foam mohawk that could
6: I removed the zipper from the fleece vest and replaced the edge with strips of industrial strength velcro. On top o that I put another velcro strip facing out for the sternum to attach to.
7:I took a ribbed plastic tube and cut it into strips which I glued onto the front of the fleece vest. I cut foam backer rods in half and glued them onto the vest for the ribs. I then used upholstery foam to add other details around the shoulders. The sternum piece was half a piece of vaccume cleaner tube with backer rod glued inside. On the backer rod I glued the other half of the velcro so it attaches and hides the seam of the chest. The top of this piece was made from upholstery foam and painted with spray paint.
8: I cut an arch shapes out of the epifoam and attached them to the shoulders to make the support of the hump shape. I then covered them with fabric and glued a foam insulation pipe along the ridge of the foam, covering the seam with strips of ribbed plastic pipes.
9: For the back pipes I carved the basic shapes out of the foam insulation, adding details with the dremel drill. I then cut a hole in the base and inserted a wooden dowel. this was repeated for all four pipes. These were inserted through holes in the back of the vest, through a piece of masonite that kept them rigid. I secured these on the inside with a screw and a washer into the end of the dowel to hold in place. They were painted with black enamel with grey highlights.
10: The legs were a black pair of pants that I glued upholstery foam to in various designs and then painted with spray paint to create all the details on them.
11: For the feet I created a splip-cover over a pair of shoes using nylon straps so they could slide off. I included a strip of velcro on the back to fasten to lock them on when worn out. The tubes on the toes were halved pieces of foam backer rod. The toes were also foam tubes with slivers cut out and glued on for the nails.
12: The hands were built off of fleece gloves. I took old skeleton gloves and cut off the fingers and glued them on the end of the gloves to extend the fingers. I covered them with felt. I then made the surface designs using strips of corduroy and black cord. I used pieced of backer rod for the knuckles and the nails which I cut out and glue on.
13: The base structure of the tail is a piece of PVC that I bent to shape with a heat gun. Over that I glued a rubber heat insulation tube. On top of that I glued a halved vacuum cleaner tube. Over top of that I cut out the segments of the tail and glued them around the whole tail. The tip of the tail was carved from a piece of epifoam and covered with black tape so it looked sharp but is in fact soft and safe.
14: To attach the tail i got a wide military belt with grommet holes in it. I also got an adjustable flag mount and inserted the end of the PVC at the base of the tail into it. I then screwed the mount to a piece of Masonite through the grommet holes in the belt. That way when the belt is strapped on the tail is up in the air.
14: The stomach and the arms are both built off of the long sleeved undershirt. The details on the arms were patched of cordouroy and black cord glued on to make the details. The stomach was just a bunch of upholstery foam and backer rods glued into the shapes of the parts. The groin flap of the stomach had velcro attached to the back so it could attach to the groin of the groin of the pants and keep it secure.
Comments for Alien Xenomorph costume
|
||
|
||
|
||
Would you consider a small donation?
You will receive my craft ebook as a thank you!

Every little bit helps! If you are enjoying this site, would you consider making a small donation? I use the extra money to help with the cost of craft supplies! With any $5.00 donation or more, you will receive my 650 page ebook full of 178 craft tutorials from this site. Thank you for your consideration!
Click here to learn more about the book, and to make a donation.
Like this Site? Please share the Love!
You can follow me here:


I invite you to subscribe to
The Creative Crafter
The Creative Crafter is my quarterly newsletter that is emailed four times per year. It lets you know about any new additions to the site. As a bonus, you will get a new craft project in your email that only subscribers get to see.