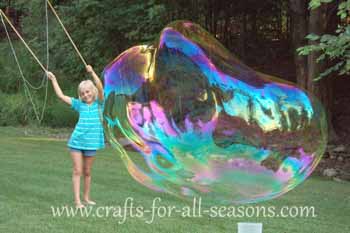
Giant Bubble Maker
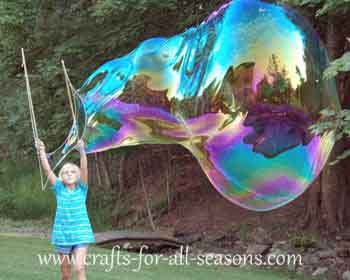
Giant bubble maker - easy to make. I promise. This is fun. I mean really fun. You have to try this with your kids this summer. Don't have kids? Borrow some or just do this for yourself. I promise it will make you smile!
The secret to giant bubbles is the recipe. Through trial and error, I have come up with a pretty good recipe, and you don't need a bunch of weird ingredients.
The bubble wands are cheap and can be made in less than 10 minutes. You will have to practice the technique a bit, which I also describe below. But it only takes a few tries.
My seven year old daughter is a pro at making these giant bubbles. I'm even including a video below so you can see the bubble making process in action! Scroll down to see all the instructions for the giant bubble maker.
Materials Needed for the Giant Bubble Maker Wands:
- Two wooden dowels. It doesn't matter how long, it doesn't matter how wide. I bought the standard length at the craft store, which was 36 inches long. Longer ones may let you get the bubble up higher in the air so it lasts longer before it hits the ground. Do make sure the dowels are thick enough in diameter so they do not bend when you hold them out. Mine was 1/2 inch in diameter.
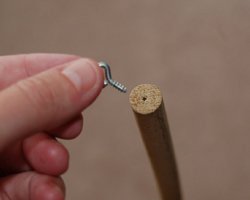
- Two small eyelet screws (I didn't even buy these, I had some from a picture frame hanging kit I purchased way back)
- Drill or dremel tool with a small drill bit
- Tape measure and scissors
- Two lengths of cotton string: 100 inches long and 65 inches long.
- Two metal washers (for adding weight to the string).
- Small container for the bubble liquid
- Giant Bubble Maker Solution (recipe below)
Recipe for the Giant Bubble Solution:
- 6 cups of warm water (distilled water is best)
- 1/2 cup of Dawn dishwashing detergent (the clear type is best)
- 1/2 cup of corn starch
- 1 TBSP of baking powder
- 1 TBSP of corn syrup (or glycerin, if you happen to have some)
Mix all the ingredients gently. Do not introduce bubbles while mixing. Here is the secret: The bubble liquid gets better the longer it sits! It should marinate overnight at least. I have found wonderful results after letting the solution sit for over two weeks. This bubble solution should last awhile. Give it a try the very next day after making it but SAVE it when you are done. Mixing it in a plastic container with a lid is a wonderful idea. The next time you decide to make bubbles the solution will work even better! Make sure to stir it gently before using, as the corn starch may settle on the bottom.
Instructions for a Giant Bubble Maker
1. Using a dremel tool or a drill with a small drill bit, drill a small hole on one end of each dowel stick. Then screw the eyelet loops into the holes.
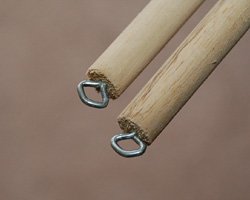
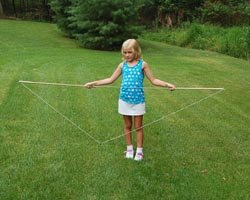
2. Measure and cut two lengths of cotton string. One should be 100 inches long. The other should be 65 inches long. Tie the end of the 100 inch string to one of the eyelets. Next, thread two washers on to the 100 inch length of string. Then, tie the other end of the 100 inch string to the other eyelet on the other dowel. It should look like this:
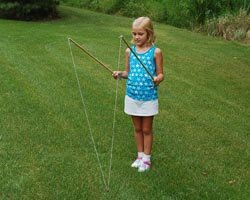
3. Now take the 65 inch long piece of string and tie the end of it to one of the eyelet loops. Tie the other length of string to the other eyelet. The giant bubble maker is now ready to use and should look like this:
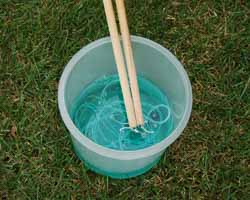
4. To make giant bubbles: Put the eyelet ends of
the dowels close together and lower them into the bubble liquid so the
entire length of the strings are submerged.
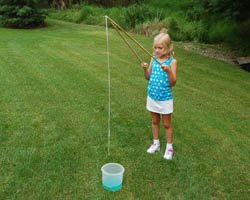
5. Slowly raise the dowels out of the bubble liquid, keeping the dowels still close together, until the strings have completely emerged from the solution.
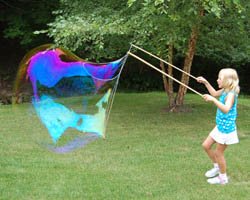
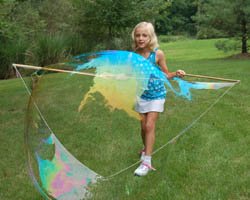
6. Then, slowly spread the strings apart by separating the
dowels. You will see a bubble wall, or bubble sheet, appear
in the triangle area of the strings.
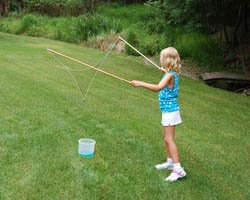
7. Slowly back up by walking backwards swiftly. If you have a breeze, you will not have to do anything! The bubble will emerge from the strings.

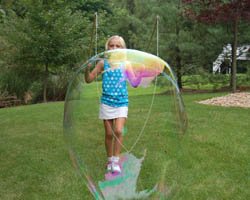
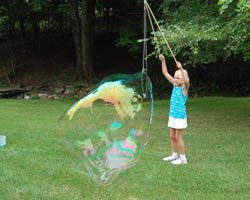
8. To close up the bubble to allow it to detach to the strings, you gently swoop the dowels ends up and close together again to "close" the triangle opening.
9. The video below will show you the proper technique. Have fun!
Would you consider a small donation?
You will receive my craft ebook as a thank you!

Every little bit helps! If you are enjoying this site, would you consider making a small donation? I use the extra money to help with the cost of craft supplies! With any $5.00 donation or more, you will receive my 650 page ebook full of 178 craft tutorials from this site. Thank you for your consideration!
Click here to learn more about the book, and to make a donation.
Like this Site? Please share the Love!
You can follow me here:


I invite you to subscribe to
The Creative Crafter
The Creative Crafter is my quarterly newsletter that is emailed four times per year. It lets you know about any new additions to the site. As a bonus, you will get a new craft project in your email that only subscribers get to see.