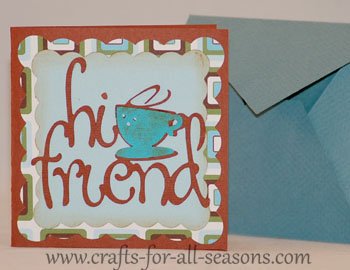
Lyrical Letters Coffee Card
Cricut Card Making Projects
This Lyrical Letters coffee card is a 4" x 4" card.
If you own the Platin SchoolBook cartridge you can make a matching envelope using a 12" x 12" piece of paper.
The cut pieces were also embellished by sponging with Distress ink in antique brown. Read on to find all the cut sizes.
Things Needed to Make this Lyrical Letters Coffee Card:
- Lyrical Letters Cartridge for coffee cup and "hi friend"
- Accent Essentials Cartridge
for the scalloped frames
- Platin SchoolBook Cartridge to make the matching envelope
- 8" x 4" cardstock for card base
- Patterned paper for the background on front and inside of card
- Solid paper for background on front of card and for printing the verse
- Two solid paper colors for "hi friend" and the coffee cup layer
- Distress ink in antique brown and sponge tool (optional)
- Paper trimmer and or scissors
- Glue stick or pen (for intricate designs I use a fine-tipped Zig pen)
Quick Summary:
- Card is 4" x 4"
Accent Essentials:
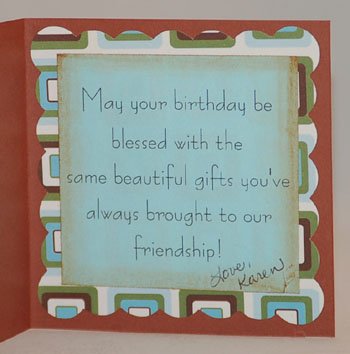
- Outer scallop frame for the front and inside was cut at 3.75" x 3.75"
- Inner scallop frame for the front was cut at 3.5" x 3.5".
Lyrical Letters:
- "Hi Friend" and coffee cup was cut at 2.75".
- Envelope cut at 4".
Detailed Instructions for the Lyrical Letters Coffee Card
1.
Fold a 4" x 8" piece of
cardstock
in half to create a 4" x 4" card. This will be the card
base.
2. Using the Accent Essentials
cartridge, select "shift", then the scalloped frame (button 47).
Press "quantity" and select 2. Cut two solid frame
and size 3.75".
3. Load a solid piece of
paper for the inner scallop frame and just cut one (or two, if you
would like one for the inside), as above, but cut at 3.5".
4.
Ink the outer edges of the scalloped frame with distress ink
and a sponge, if desired. Assemble the card by layering the
frames and adhering to the card.
5. Using
the Lyrical Letters cartridge, load a solid color of paper for "hi
friend". Select "best wishes" (button 47), then press "Loop
Dee Loo". Cut this at size 2.75".
6.
Load a contrasting sheet of paper for the coffee cup layer.
Press "shift", then "repeat last". Press cut.
7.
I sponged the coffee cup with a bit of distress ink.
Then glue everything to the front of the card. Hand
write a note inside or print out a verse in a 3.5" x 3.5" inch square
on your computer.
8. To make the matching
envelope, load a 8.5" x 11" piece of paper into the Cricut.
Using Platin Schoolbook, select the envelope. Do
this by selecting the card (button 48), then press "shift",
then press "roly poly". Cut at size 4". Score and
fold along the notches, and glue the envelope sides together.
Would you consider a small donation?
You will receive my craft ebook as a thank you!
Every little bit helps! If you are enjoying this site, would you consider making a small donation? I use the extra money to help with the cost of craft supplies! With any $5.00 donation or more, you will receive my 650 page ebook full of 178 craft tutorials from this site. Thank you for your consideration!
Click here to learn more about the book, and to make a donation.


