Make a Fairy Garden...
from the furniture to the fairies!

My kids wanted to make a fairy garden so I thought I'd try it by making all the accessories instead of buying them. Actually, the original idea of a fairy garden came from my friend Heather. She told me her daughters have a fairy garden and just love tending to the plants and adding new furniture and lawn ornaments to the garden.
The idea was new to me, so I asked her to explain. I wasn't exactly sure what a "fairy garden" was. She explained that it is a small area in their backyard where her girls add small plants and have added tiny furniture and lawn ornaments for fairies. A quick image search on Google showed me lots of photos and I quickly got the idea. I asked Heather about the fairies, and she told me that since her garden is outside, the fairies are all the butterflies and dragonflies that come visit the garden. Isn't that super cute? I thought it was such a nice idea, and a fun way to introduce your children to gardening.
We have a lot of deer in our backyard, so I knew we would have to set up our fairy garden in some type of container or planter. And of course, I knew I wanted to make the house and furniture, although you can buy all the accessories you may need.
In this article, I explain how we set up the fairy garden and how we made the fairy garden house, the walkway, a fence, an Adirondack chair, and the fairies themselves. I've included links below to jump around on the page if you are only interested in certain directions.
I have really enjoyed making this and my daughters have enjoyed taking good care of the garden. It is so fun watching them play with it. They even put their little Lego guys in the garden or other figurines!
Did you make a fairy garden? If so, I welcome you to post your pictures by clicking here. It would be wonderful to see all your gardens and miniatures! If you also have suggestions on other ways to make accessories I'd love to hear. For instance, Heather's garden has a tiny gazing ball, which is a pretty marble!
Things
needed to make a fairy garden:
- A container, if you are
keeping your garden inside or on a
porch
- Potting soil
- Small plants (I name the specific plants I used below in the directions)
Things
needed to
make the walkway, house, and fence:
- Gravel (aquarium gravel works great)
- Various size stones (most I used were the size of a quarter)
- Strong glue (try a 2-part epoxy or E6000)
- Scissors
- Wooden craft sticks
- Brown and light brown paint (or colors of your choice)
- Package of sheet moss (found in craft stores, usually in the floral department)
- Acrylic spray sealer (if placing outside)
Things
needed to
make the Adirondack chair:
- Strong glue (try a 2-part epoxy or E6000)
- Scissors
- Wooden craft sticks
- Brown and light brown paint (or colors of your choice)
- Acrylic spray sealer (if placing outside)
Things
needed to
make the polymer clay fairies:
- Translucent color polymer clay
- Flesh colored polymer clay
- Black polymer clay
- Teal and purple polymer clay (your color choice, for her dress)
- Yellow, brown, or black polymer clay (your color choice, for her hair)
- Acrylic spray sealer (if placing outside)
Use these links to jump to places within the article:
Instructions to Make a Fairy Garden
1. If you wish to make a fairy garden in a container, take some time to figure out what type of container to use. Many people use a large decorative pot. You can also buy special tray at some garden stores, that are made just for the purpose of creating fairy gardens. I went a very inexpensive route. I picked up this plastic planter dish at Lowe's for $1.77. It is meant to be a drip tray to go under your potted plants. This worked great, although you will need some reinforcement underneath it to move it, since it gets heavier with soil. I used a cardboard disc from a pizza (or a round pizza cookie sheet works well too). You may wish to poke some holes in the bottom for drainage. I did not do this, but I am careful to water sparingly and to mist my plants as opposed to giving them tons of water.

2. Go to the nursery and buy some small garden plants. If you tell the
employees that you want to make a fairy
garden you may find that they have a whole section of
plants devoted just to fairy gardening. Succulents work
great, and
they require little maintenance and water. I used the
following
plants: Ivy spearpoint (Hedera helix), Hypoestes, and a succulent (not
sure of the formal name) . Note: The clover plant shown on
the right
(Blue Star Creeper, Isotoma fluviatus) didn't survive the transplant
well, but all the other plants worked
great and are thriving.

3. Add potting soil to the container you bought and plant your garden. Be sure to leave room for a fairy house and other furniture.

Making a Fairy House
4. To make the house, I used a bag of stones I bought at the
garden store. Most of the stones were about the size of a
quarter. If you are going to put your fairy garden outside, it is important to use a strong, waterproof glue. A two-part epoxy or E6000 adhesive works well. I glued the rocks in a square shape
and
built the house. I then built up the front and back of the house in a
triangle to support a roof. I left an open space for a front
door.

5. To the make the roof, I used small wooden craft sticks. I found these sticks to be very easy to work with since you can easily cut the sticks to the length you need with scissors. Again, an adult should do these steps, but I think you will find that your kids will love watching! Lay them side by side until you have enough sticks to fit the length of the house. Secure them together by gluing on a stick horizontally, as shown.

6. Attach the roof to the house by gluing it to at the peak, and to any stones it may touch of the sides. Don't worry if you have some gaps in the house between the walls and the roof, we'll fix that later.

7. Paint the roof dark brown or any color of your choice. This is a fun step for children to help with.

8. When the roof is dry, you can use smaller stones to fill in any gaps you may see. Apply some glue to the small stones, and then you can pick them up with a pair of tweezers to place them if you need to.
9. I added a bit of sheet moss to the roof. I just
pulled some off of the sheet moss and glued it on.

10. To make a door, once again gather some small wooden craft
sticks and place them side by side. I wanted my door to have
a
curved top so I staggered the sticks as shown. Once again, I
held
them all together by gluing a craft stick (which had been cut to length
with scissors) horizontally across all the sticks. Once dry,
the
bottom was cut off blunt to make the door the proper height.


11. The door was painted and a small pebble was glued on as a
door knob. I then glued the door on the house, and filled in
any
gaps between the house and the door with small stones. Lastly, give your house a few coats of acrylic sealing spray.

Making the Walkway
12. The walkway was fun and easy to make, and is a good step for children to do. Pour some gravel in a pathway leading up to the house. The gravel pathway can then be lined with larger stones on either side.

Making the Fence
13. The fence was made by sticking small wooden
craft sticks next the pathway as posts.

14. To make the cross beams, cut the wooden crafts sticks
with
scissors to the proper length. Using a strong glue, secure
the
pieces between each post.

Making an Adirondack Chair
15. The Adirondack chair is
made using the small
wooden
craft sticks. Cut two of the sticks in half, and place the
four
pieces side by side. Secure them with two horizontal craft
stick
glued across the edges (this photo is not shown, but you can see it in
the photo on step 16). This is the chair seat.

16. To make the chair back, line up four sticks, but stagger
the
ends to create a curved top, as shown. Secure them with a
horizontal craft stick glued across them. Once dry, you can
cut
off the bottom to make it flush (photo not shown). Using strong glue, secure the chair back to the chair seat, making sure the
chair back is leaning back at an angle.


17. Cut another wooden stick to length and glue it the back
of
the chair and reaching the bottom. Use the photos as
guidance. Do this for both sides.

18. Create arms of the chairs by gluing a wooden craft stick
(cut
to length) from the chair back to the front. You can only use
one
drop of glue at the base of the stick for this step, but the arms will
be supported in the front at the next step.

19. Glue on two more sticks, cut to length, supporting the arms of the chair and reaching the ground. These are the front chair legs.


20. Paint the chair the color of your choice, or leave it
natural. I chose a light brown. Give it a few coats of acrylic sealing spray, especially if it will be used outside.

Making Polymer Clay Fairies
20. These polymer clay fairies were quite easy to make, but the idea was not by own. I am going to refer you to a wonderful site that takes you through the step by step directions on how to make these little beauties. You will need translucent polymer clay to create the gorgeous wings on these fairies. Please visit Polymer Clay Central for the tutorial.


Photos From Others
Fairy Gardens by Dayna from California:


Aren't these so creative? These are from Dayna in California and everything you see is handmade. Thank you Dayna for sharing your fairy gardens with us!
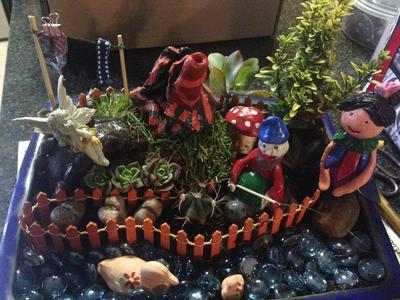
Here's a fairy garden from Clarette in South Africa. She created a river using blue glass stones and even made the little fishing rod! She adorned this with petite succulents. Thank you for sharing your photo with us Clarette!
Would you consider a small donation?
You will receive my craft ebook as a thank you!

Every little bit helps! If you are enjoying this site, would you consider making a small donation? I use the extra money to help with the cost of craft supplies! With any $5.00 donation or more, you will receive my 650 page ebook full of 178 craft tutorials from this site. Thank you for your consideration!
Click here to learn more about the book, and to make a donation.
Home › Spring Crafts › Fairy Garden
Home › Crafts For Adults › Fairy Garden
Home › Crafts for Teens › Fairy Garden
Like this Site? Please share the Love!
You can follow me here:


I invite you to subscribe to
The Creative Crafter
The Creative Crafter is my quarterly newsletter that is emailed four times per year. It lets you know about any new additions to the site. As a bonus, you will get a new craft project in your email that only subscribers get to see.